Saturday, March 31, 2012

Braided Bun

Hey Ladies! So excited to share with you guys this look that I sported 3 days ago. 
It is a simple braided bun. I Love it!!!
I will explain step by step how I did it so you guys can sport the look also... 


Things you will need:
  • Two Hair Elastics
  • Bobby Pins
  • Hair Spray

STEP 1: 
Pull your hair back into a ponytail like Fergie. Make sure you sleek it back with a nice hair wax or hair pomade using a comb first then with a boar brush. A good styling wax is Redken 03 Water Wax Pomade 1.7 Ounces. Tie the tail with an elastic.
STEP 2:
Braid your ponytail neatly all the way to the tip like Fergie's in the picture below. Secure end if braid with a small elastic.
STEP 3:
Grab the braid and wrap it into a neat bun. Tuck in the ends so it is not visible and secure with bobby pins. Add a little bit of control hair spray like Garnier Fructis Style Flexible Control Aero Hairspray, 8.25 Ounce and WAH-LAHHH you are done!!! 
Amazinnnggg!


This is super model Heidi Klum wearing her braided bun on the red carpet 
hers is obviously more elaborate because she is wearing extensions for a more dramatic full look
She looks like a grecian goddess! just awesome!

Here is Jennifer Lopez also wearing the bun she pulls the look together making it look
simple and effortless
she looks so classy! Simply Fab!


This look is sooo easy to do and it only takes about 7 minutes to complete. It is preferable for medium to long hair lengths and the reason why is because you will need enough hair length to be able to wrap the braid around into a bun and if you have short hair it will be impossible to do unless you have hair extensions to add length.

...And just so you know French Braids have been around for ages since the 18th-century when worn they can be classified as hippie or 'BoHo chic'. Buns are so classy and elegant so when you mix the two together you are in for a great combination. You can wear this style day or night, for any occasion as long as you accessorize the right way.
Enjoy your Braided Bun Girls! Try it at home and tell me all about it! Xo!


You might also like these products:


Wednesday, March 28, 2012

Ladies Summer is near! It's time to get your wax on!

ATTENTION LADIES! Summer time is right around the corner and we all know what that means!

It is time to get in shape in order to fit into our bikinis! But wait!---Summertime also means showing off your skin and bikini line area and I know you want to flaunt smooth, bump-free hairless skin...

Well, if you agree and nodding your head "YES" right now then I have the solution for you... WAXING!


There are many reasons why you should stop shaving and opt for waxing. Even though the skin will be smooth instantly after shaving the results will only last you about 2-3 days. The hairs will grow back coarser and may become stubbly. The reason why this may happen is because when you are shaving you're only cutting the hairs from the surface of the skin. So when they grow back they all grow at the same rate so the shock and feel is more abrasive. Shaving is indeed painless and fast but it does dry out and over exfoliate the skin which is why irritation occurs many times afterwards. So when you think about it, it is not so painless after all. Shaving also causes ingrown hairs which may look like dark bumps on your skin which means the hair is trapped and growing below the surface of the skin. Shaving also causes red elevated rash-like bumps and that is called a razor burn. Both conditions are very uncomfortable and it is better to avoid them all together.

       VS.


Personally, I feel waxing is the way to go! It leaves your skin feeling clean and smooth and the reason why is because you are removing the hair from the root below the surface of the skin. Because of this method of removal, hairs grow at a slower rate and looks more scarce once it grows back. Hairs may also appear finer and softer. With waxing, there are no bumps on your bikini area. Throughout time, the skin clears up and also brightens. Yes! there is a degree of pain involved with waxing but with time you will become used to it. Also, the more you get waxed the slower that hair growth rate so that means less pain. The best part about waxing is that the results are very long lasting...more than shaving. Waxing lasts about 2 1/2 weeks-4 weeks depending on how fast your hair grows. That sure beats having to shave every 2-3 days if you tell me!

My Personal Experience...

After years of trying out different spas and paying ridiculously amounts of money I finally found my match. I found a place that is affordable and clean. I also found a waxing specialist with years of experience that is very professional.

My spa of preference is called cbWaxpert and it is located in New York City and I try to go at least every three weeks for proper maintenance. At cbWaxpert you won't ever have to worry about privacy, the owner/aesthetician Corina sees one client at a time and ensures proper scheduling so overbooking will never occur. While you're paying it's when the next client walks in and in my eyes that's the way it should be at all spas.

When it comes down to it my experiences at other spas will never compare with my experience at Corina's. Most spas will immediately charge you extra if they feel you have "extra hair" but if you ask me that is very discriminating and embarrassing. They should take into consideration that not everyone share the same ethnic background. Latinos, Middle Easterners and African americans naturally have more hair, it is just in our DNA LOL we can't help it! It is wrong for some spas to makes us feel bad for having a little extra hair in the southern region... Not only that but most of the other spas I went to burned me while rushing through the job leaving hair behind. But not Corina! Corina's style of waxing is virtually painless! She has a fast and clean technique of waxing. Compared to other estheticians that have waxed me before, she does the best job at not hurting or burning me. Another thing that I appreciate is the fact that she does not double dip her spatula into the wax so the fact that there is no cross-contamination going on makes me feel safer. Plus, I graduated from aesthetics school myself so cleanliness and sanitation was one of the main subjects taught to me. So I always look out for that at any salon. She uses gloves and a mask and a medical table with wax paper all over so you won't have to worry about germs and bacteria being spread around.

Some other places charge you close to $100 just to get a brazilian wax not including tip...
For that price at cbWaxpert I get a full brazilian wax, full legs waxed and I still have left over for tip...
So there's no reason why you need to keep waisting your time and money call the spa and schedule your next appointment...ASAP!

For a listing of all the other services offered at this spa, including pricing and contact information visit Corina's website at: http://cbrasilwaxpert.com/index
trust me you will not be disappointed. :)

Swimsuit Photo shoot
Back in February I had a swimsuit photo shoot in Miami. Before my photo shoot I made sure I locked in my wax appointment. My skin was smooth, bump-free and hairless and here are the pictures to prove it...
Simply GORGE right? LOL


So ditch your razors and get your WAX ON!
What hair removal methods are you into?
I would love to know fill me in with a post. Xo!

Thursday, March 22, 2012

My Top 10 Beauty Must Haves!!!

Hey there my lovely Sirens!
So I get a lot of questions often on what type of products I use for my hair, skin, etc... and thought to myself why not create a post where I can show the world what products I absolutely cannot live without! All the products listed below can be easily purchased at your nearest pharmacy and are pocket friendly so there is no excuse to let yourself go ladies! Please go and check these products out if you haven't already.


My absolute favorite hair products are: 
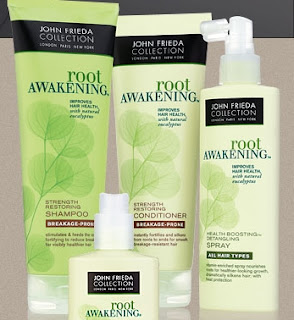
1. So I like to wash my hair before I straighten it with a Shampoo that is moisturizing and will provide a good lather that's going to leave my hair with that squeaky clean feeling. This Shampoo and Conditioner  Root Awakening by the John Frieda Collection definitely does the job. Not only does it leave your scalp feeling minty clean, but it is the only Shampoo & Conditioner that I have tried that actually helps aid in detangling hair in the shower fast with hardly any breakage!


2. After I wash my hair I towel dry it until it is damp. Next I grab some Moroccan Oil pour a quarter size onto my palms (because I have very long hair) and apply it all over my strands starting from my ends and working my way upwards to the roots. Not only does it cut my blowdrying time but it also protects my hair from the heat and leaves my hair feeling smooth, moisturized, shinny, and bouncy...Def a must have ladies!

3. The last thing I do after my hair is dried and flat ironed is put some anti-frizz hair serum. After years of trying different brands of serums I was glad to find this one from the John Frieda Collection. It is THE BEST and it smells sooo good. It leaves my hair looking sleek, shinny and most importantly NOT FRIZZY AT ALL! LOL
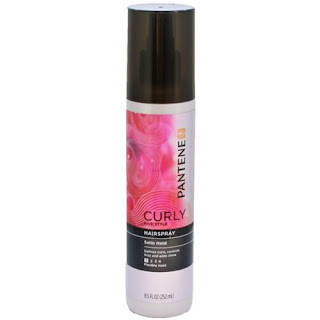
4. On those hot summer days when straightening my hair becomes a drag I usually leave it out natural and curly. But I can't just walk out the house without applying any product! I usually apply mousse and spray it lightly. My absolute favorite curling products that don't weigh my hair down and leaves it controlled is PANTENE Curly hair style line. It leaves every curl shinny and in tact for hours! LOVE, LOVE, LOVE!
My Favorite Skin Care Products are: 
5. For many years I have suffered with acne and with time I have come to realize that the cause of my acne was a combination of carrying a poor diet, stress, lack of sleep, etc. I have tried many products in the market from very expensive ones to very affordable ones and many left me with little to no results. Then I started taking care of myself, started to eat less junk food, drank more water, eliminated some of the things in my life that were stressing me out, regulated my sleeping pattern and noticed my skin was clearing up little by little. Then I really got into exfoliating my skin 2-3 times a week with facial scrubs and saw that it helped me to get rid of all of the dead skin that was clogging up my pores and causing breakouts. It wasn't until I started using the Neutrogena Daily Cleansing Pads that I noticed my skin tightening and smoothing out. I fell in love! I swear I use this product every other night and replaced it with my regular exfoliating scrub. I use it after cleansing my skin and use the rough part of the pad in circular motions to exfoliate. Definitely a MUST have if you have acne prone skin!


6.  After I cleanse my face in the morning I massage a drop of this moisturizer by BURT'S BEES on my face. It keeps my skin glowing and refreshed and it also helps prevent and control breakouts thanks to the salicylic acid within the ingredients. It took my skin a couple days to get used to this moisturizer and made my skin feel really greasy at first but after like the fourth day of daily use it didn't feel greasy anymore and it helped my skin look clearer and smoother. Definitely one of my ultimate favs!
7. I am obsessed with good smelling natural soaps! and I am sooo happy I discovered this line of natural soaps at the drug store one day. My favorite scent of the Yardley soap line is the one pictured below it is called Pomegranate Rose. Leaves me feeling refreshed, and clean. Did I mention it smells yummy?! LOL

8. Anyone who is anyone has tried this lotion at least once in their lives! Johnson&Johnson's baby lotion has been around for years and this lotion will do the job. Leaves your skin feeling smooth and moisturized without leaving a trace of stickiness or a greasy feeling behind. I bet we all can agree that if it was meant for a baby's skin then it can't do no wrong on our skin! Definitely on my favorite list!


 Lips :                                                                                                       
     
9. Addicted to this lip balm! Especially during the winter season! I use it alone or use it as a lipstick primer and it helps for a smooth color application and colors last longer. 


10. I am all about promoting healthy pearly whites! Having had worked in a Teeth Whitening company like BriteSmile before definitely had a lot to do with it. My favorite whitening mouthwash is this one pictured below by Listerine. After one rinse I saw the difference! I have to admit it does stings a little but it does the job right and I see results.


These are my top 10 beauty product and I use them everyday! 
What are your favorite every day over the counter products?
Share your response! Xo!


Tuesday, March 20, 2012

Crazy About 'TOCCA' FRAGRANCES!

Hey Dolls! Just wanted to share with you what my favorite fragrance is at the moment
*Drum Roll Please*-------------------------------------------------------------Fragrances by TOCCA!
If you haven't seen or heard of these perfumes before here is a picture of what they look like...


Aren't they just so cute?! I am in love with the design and the packaging...


It has always been a challenge for me to find a fragrance that not only smells good, but that is also very long lasting. It is also a challenge to find something that people hardly know of.

I don't know about you guys but I just hate it when I am wearing a fragrance that someone in the room is also wearing. I like to be different so I try my best to take my time to find something that people haven't noticed or used yet.

Smelling exactly like another person is not an option for me! LOL

My signature scent used to be the Silver bottled Perfume by GUESS here's a picture below
So I got tired of my signature GUESS scent and was searching for something
different, mysterious and flirty...and I stumbled upon the 'TOCCA' line of fragrances and was instantly attracted to the packaging and the design of the bottle simply because it's manufactured like no other.

I will not lie it took me about 30 to 40 minutes of smelling all the different scents over and over again to finally decide on one. That's how good they all smell!

I made up my mind and picked the scent called 'Giulietta'... I swear I'm in love... I wear it everyday and can't get enough it's such a sweet intense floral scent. I spray it everywhere from my bedroom to my clothes just to add a personal touch to everything I own...LOL (OBSESSED!)

Giulietta by 'TOCCA' has...
Top notes: Ylang Ylang, Green Apples, Bulgarian Rose, and Pink Tulips
Middle notes: Iris Pallida, Vanilla Orchid, Lily of the Valley, Heliotrope
Bottom notes:  Musk, Amber,Cedarwood, Sandalwood


If you're at Sephora stop by the 'TOCCA' section and take a sniff...you will thank me later  ;)
     

What is your favorite scent at the moment? Go ahead share your thoughts... I would love to know! Xo!


Monday, March 19, 2012

Kim Kardashian Rocks bright lips!

 So I was looking through some pictures to get new inspiration for makeup looks. I stumbled upon these beautiful pictures of Kim Kardashian. I have always been a huge fan of hers but when I saw these pictures I just fell in love with this look!
Notice how Kim put the focus on her lips as opposed to her eyes for this shoot...
This tone of pink is just gorgeous on her complexion and it is perfect for spring which is also right around the corner.
I don't know about you guys but I will definitely rock 
a bright lip this season! LOL


So I re-created my own version of Kim's look with a couple of changes and here are some pictures...


Step by Step guide of my version with visuals...

Start your makeup application with a clean moisturized face. 
Apply concealer under dark eye circles, dark spots, scars and any hyper pigmented areas on skin. 
Apply a even layer of foundation. Remember, a little goes a long way and Blend, Blend, Blend!

Now we have a clear canvas to to start!

1.  Apply Eye Shadow primer all over eyelid and brow bone. A good eye shadow primer is Urban Decay Eyeshadow Primer Potion, Eyeshadow Base .34 fl oz (10 ml)


2.  Apply a light gray shadow on lids ending at the crease. The palette I used was Coastal Scents 88 Eye Shadow Palette, Ultra Shimmer I used the second row from the right, the fourth color down from the top. I can best describe it as a light shimmery gray bronzed color.

3. Mix Black and Brown shadow and apply onto the crease. The colors I used from my Coastal Scents 88 Eye Shadow Palette, Ultra Shimmer were black and dark brown. The two last colors on the bottom of the first row from the right.

4. Buff, Buff, Buff! the color onto the crease an outer corners until it fades...


5. Keep adding black into the outer corners to add definition... also add a light shimmery eye shadow on brow bone...


6. Fill in your eyebrows with a color that is lighter than your hair color. My hair is Black so I use Dark Brown. My favorite is Milani Brow Fix Medium #02which is what I used on the picture below.


7. Apply liquid Eyeliner on the top of your eyelids, also apply regular black eyeliner on bottom lashline/ waterline, put on some mascara and Waa-Laaah! your done with your eyes!


Next Step is to contour cheeks using a deep bronzed color. I used NARS Bronzing Powder Laguna.
Then apply a rosy pink blush like Kim K's I used MAC Blush Powder - Desert Rose - 6g/0.21oz.
And lastly, PUCKER UP and put on some bright pink lipstick! I used MAC Pro Amplified Creme lipstick -- SHOW ORCHID.


 As you can see my look is a little more dramatic than Kim's but it was definitely inspired by hers!
Im OBSESSED with instagram! LOL

PRODUCTS I USED: